Latest Post

Rockford Cosplayer's Meetup at Edward's Apple Orchard

A few weeks ago I had created a group on facebook specifically to get cosplayers from Rockford, Illinois together. To kick it off, I also created an event at Edward's Apple Orchard in Poplar Grove. It's a yearly tradition for me to head out there and buy a few dozen donuts to pass out to friends and family. The turnout was pretty great but it was an even split between Rockford and Chicago area people.


It took us a while to actually get out to the orchard to pick our own apples since the tractor used to ride out there was a little out of the way and hidden. The price was a bit insane but totally worth it to be able to get photos out there. If only it were a bit warmer. @_@


 The day was rather cold but it was fun being able to hang out with a bunch of cosplayers at the orchard. The staff and other visitors were surprisingly very accepting of cosplayers in this area. Even better, the cosplays were kept pretty tame at the event!

Since the event went so well this year I may possibly be organizing another meetup at the orchard next year. One thing is for sure though; there will be many more meetups throughout the years to come for the Rockford Cosplayers group!


To see more photos visit my facebook album!


Edwards Apple Orchard Cosplay Meetup

Yesterday I went to a meetup at a place called Edwards Apple Orchard.  There are actually two places with the same name in this area, but we went to the one in Poplar Grove, IL.

If you want to learn more about my photographs taken at the orchard, check out my related article


Hot Cider
We met in the early afternoon.  Even so, the temperature was extremely low.  The place had a small stall where they served hot cider, which was great benefit given the situation, and reasonably priced at $1.20 plus tax.  After the cider was finished, I eventually went back to my car for gloves and a hat.  I'm incapable of handing the cold like most people. 


Some of the buildings.

There were multiple barns that each housed different types of food and gifts.  One had classic American foodstuffs like hotdogs and chips. Another had their specialties like apple donuts, cider and pie.  The main building had a large gift shop with a produce section as well as a fudge shop and more access to their specialty donuts.  As we had plans to eat dinner after this excursion, so we only focused on the specialty goodies.


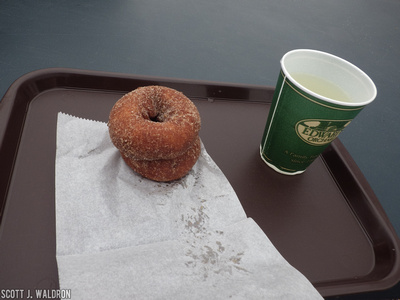
Their specialty apple infused donuts.

I ended up trying their donuts and lemonade.  The donuts were still warm with a crispy sugar covered coating, yet the inside had a fluffy texture. I can see why people are so excited about the orchard's donuts.  It's the type of food that works best with the right conditions of having them from the kitchen to the customer, although I'm sure they are good when they are cold as well.  The lemonade wasn't a common store bought variety, but appeared to be made on the premises with some pulp in the mix.


The orchard also allows people to pick their own apples and pumpkins from their fields.  Our group decided to use that opportunity to have our main photo sessions out there.  The farm area was very busy, so we were unable to find a sufficiently decent spot to take some photos of the people in cosplay.  To access the apple orchard, there is a minimum fee involved where you must buy at least one basket of apples at $40 + 3 for the basket.  So whether you fill the basket or not, you will end up paying at least $43.  The fun part is that you get to ride a tractor with a flat bed trailer attached to the actual orchard.


The main photographer taking photos!
The orchard turned out the be a great location to shoot in.  Each row of apple trees were pretty thick, allowing for a nice natural backdrop. 

Our basket of hand-picked apples.
I was using a simple Pentax Optio WG-2 digicam, but I am happy with the results. While I don't currently have any DSLR camera bodies, it was fun to use something small and of lesser technical quality to challenge myself.


Smaller gatherings and meetups can be just as much fun as conventions if you allow them to be.  If you know a group of people with similar interests, I'd suggest trying to set something up.  Enjoy your mutual hobbies is possible in any setting.

The only decent photo I have of everyone including myself.
 

Ramencon 2012 and Cosplay Photography Talk

I attended Ramencon 2012.  It is an anime convention located in northern Indiana somewhat close to Chicago, Illinois.  You can learn more about their yearly convention here.

I already wrote about the convention on my photography website that includes a few details about what equipment and techniques I was using.  I also included a few of my favorite photos from the convention on there.  To keep things fresh, I'll select a few different I liked to display here.


The convention was small, yet fun overall.  This is one that everyone should consider attending if you are in the northern Indiana area. I personally prefer larger conventions most of the time due to things like a larger layout (I can only walk around a small convention so many times before getting board) and more people in cosplay, but that's just me and how I tend to go about convention photography. 

I like to talk about the social aspects of conventions on cvfta.blogspot.com, but this time I'm going to do a mixture of that with something related to convention photography.  Don't worry, I won't be talking about things like aperture, shutter speed, and ISO!  I'll actually be writing somewhat of a rant on the subject...

In the case of a smaller convention like Ramencon (2012 is only the 2nd year), you can see I tended toward small photo sessions instead of a large number of unique cosplays, which really is not possible in this situation.  Luckily, I had some photographer friends around who were part of helping to set things up, or others who were part of the session as models that put in the time and effort to work with me.  I don't usually go out of my way to set up sessions like that, so what you see above is from mostly others putting in some motivation or effort to include me.  Thanks guys. :)

I had my first outright denial for a (group) picture as I, somewhat abruptly, asked for a hallway cosplay photo as I passed by a group of cosplayers.  Well, probably not the first, but it is so infrequent that I don't recall, off hand, any specific instances from the past that were so extreme. 

I'll state, as I have in the past, I and other photographers don't get that much out of this hobby, and most of what I or others do here is for the people in costume and also to help promote and document the convention.  I make the best images I can, given whatever the current circumstances are, for the person(s) in the photo.  I like getting acknowledgement or other benefits from this as I think anyone else would, but as of yet, it isn't nearly what the expense in time and other costs are.

The purpose of and goals of a convention photographer are often misunderstood as some type of fandom or a potentially selfish/negative thing.  While I or other photographers might have a fondness for a given character that can help motivate us, there is a good chance we won't even know who you are cosplaying (that won't stop us from asking and incorporating what we learn from you into the resulting photos).

Having the main focus on photography and documenting the convention for the sake of it doesn't make the request for a photo any less genuine or valid.  We might recognize the detail of your work, or some other aspect that makes it worth our effort and time to ask. The photographer really has no true use for the final work.  The images don't have any intrinsic value after it is taken, post-processed, and displayed.

Occurrences like this are rare and it isn't something to get worked up over (I laughed it off at the time and went about my business).  I generally have my own internal guidelines for who and when I ask for a hallway photo, and in this case, I think I probably was a bit off the mark and the result spoke for itself.  Live and learn.

If you have any to say on this, feel free to start a discussion in the comments section.


Star Trails And Fails


So it begins…
  
   Being new to the photography world, I haven’t had the chance to explore too many of the multitudes of different styles available to experiment with. However before I purchased my cameras I always had a fascination with the photographs I would see that were taken at night, whether it be landscapes, cityscapes, or images of the night sky. You can probably attribute this to me being a night person. So when I purchased my first camera I knew one of the first things I wanted to try was Star Trail Photography.

Fail…And Fail Again

   Now the first time I went out and attempted to take my Star Trail photos, I had images of grandeur, I was certain that my photos would be spectacular! I mean how hard can it be right? You put your camera on a tripod, get a remote for shutter control, and just leave your shutter open for a couple hours. Haha oh how wrong I was. Now if you’re not a novice like me, you can probably imagine how terrible my first images were. Not only was I too close to the light pollution from the city, but there was a full moon, so you can imagine how overexposed my images were.

MAXIMUM DERPAGE!!!!

   I was determined though! Haha I was going to get this image technique down pat, or punt my camera into a large body of water in a fit of rage if I didn’t! After a little research I found that there were several stacking programs that would overlay the images you took to produce the star trail effects. Now at first I was frustrated because I have a mac, and for whatever reason, be it me operating at maximum derpage while searching, or just not paying attention, I couldn’t find any mac specific software. That is until I came across Dr. Russell Brown’s Star Trail Action script for photoshop. FINALLY, my problems were solved! I was for sure going to be on my way to Star Trail Glory!! However, that wasn’t quite the case. While Dr. Brown’s Star Trail Action script does do an excellent job at producing star trails, it wasn’t exactly what I was looking for. I wanted my photos to produce the trail effects, not Photoshop.

Let's Try This Again...

   Upon investigating a little more, I found another one of Mr. Brown’s scripts, his “stock-o-matic” script. This was exactly what I was looking for. What seemed like a basic stacking script! After installing the script, I was pretty impressed at the results when I ran it through my first batch of photos! This is the finished product from the first run through with the Stack-o-matic script.


I took this picture about 5 minutes outside of town(still probably not far enough away from the city lights) at a forest preserve, and was right next to the river(you can see the reflection in the lower right hand corner). I wish I would have thought to incorporate that more into the photo, I guess there's always next time! I’m definitely looking forward to putting this script to better use! So after feeling like an idiot for the better part of a few weeks, I finally got the hang of producing photos with these effects. Now it feels like I’ve been making these photos forever! It’s pretty cool how humbling photography can make you feel, but there isn’t a better feeling when things come together for an excellent shot!

Here's a link to my flickr account, feel free to check out some of my other photos at a higher resolution(They still don't do the full size images justice though!)


Modifying Purchased Cosplay (Spiderman)

I like cosplay and have actually done it occasionally for as long as I've been attending conventions and taking photos.  My first cosplay was Rumina Asagi from an anime called Tokyo Underground that I wore at Ohayocon 2003.  It was a simple cosplay that I assembled from pieces I found locally and online.  The only homemade item for that costume was the long headband.  Most of my costumes have been from pieces I find and then apply simple modifications to.

I just recently acquired a Zentai style (full body) Spiderman suit.  What better costume would a photographer use?  Peter Parker is probably one of the most well known photographers in the comic universe, so it was an easy decision.

The suits are around $50 shipped on Ebay, which was the absolute limit I was willing to risk on my idea.  It turns out the costume isn't too bad for the price.  The only thing I didn't like much was the eye mesh and lack of a clean finish to the cut-outs.  The mesh was much too see-through, so I knew photos would turn out bad.

First, I tried just using sunglasses under the costume and that didn't work out too well.  As the costume shifted, parts of my skin would be visible.


Next, I also tried sewing some white fabric on the inside to cover up the corners and other areas my skin would generally show through. It worked relatively well, but just wasn't enough and looked a bit odd.  I wanted something better looking.

Finally, I broke down and bought some one-way mirrored film from Home Depot (Gila 3 ft. x 15 ft. Mirrored Privacy Control Window Film).  The negative was it only comes in a massive quantity compared to what I needed, but was still a reasonable price and I could see it being useful for other projects (if you want to buy some or the rest of it from me and are around northern Illinois, let me know! haha).


This entire idea came from searching on Google for what others had done to get nice mirrored eyes with Spiderman costumes.  This Youtube video was my main inspiration and basically the method I followed.  In my case I used home window film instead of one for automotive glass (I don't think the type I wanted is legal here because Walmart only carried black tint).

As you can see from the photo above, I had a pretty simple construction process to follow.
- I cleaned up the eye sockets by removing small bits of fabric where the manufacture didn't properly cut things.  This helped improve the visual look in general.
- I applied the privacy film to flexible plastic.  In my case I  randomly found 60 cent pencil cases at Walmart while I was looking for mirror film.  One side of the case was usable and enough for both eyes.
- I applied the window film to the plastic with Windex and a credit card type object. I let that dry for a day compressed under a heavy object like a book.  This step probably wasn't necessary and I think I could have used the film by itself because it already had a thin plastic backing to it.  The one benefit is that it straightens out the film because it comes naturally curved from the store.
- I drew outlines on baggy plastic from the costume eyes because they are not exactly the same size. I then traced that onto the window film/plastic combination... making sure to have a large amount of extra around the eye for sewing.
- I sewed the eye pieces to the back inside of the costume, making sure I had it facing the proper direction.  I decided on the inside because I wanted to keep the existing mesh and black outlining fabric.  I think the mesh plus the mirror finish looks really good together.  The mesh softens out the super reflectivity of the film.
- Sewing was the most difficult part for me.  I have not spent the time to learn proper technique, so I've developed a method over the years that is basically extreme overkill.  I sew and knot the string a large number of times around the eye holes.  It looks messy in the back, but I really don't expect it to come undone ever.  The key thing to do when sewing them on is to use pins to hold the eyepieces to the fabric.  If you don't do that you will end up with a bad result.  The pins keep it in position and free up both hands to handle the needle.  Otherwise, I found it almost impossible to get the thing attached until I had that duh moment... "So that's what pins are for...."  I also trimmed and rounded the eyepieces after sewing them so it wouldn't poke my face.


Below is the final result as a self portrait.  I used full add-on flash.  As you can see, the mirror film works great, not allowing my eyes to be seen at all.  The film works best when there is no back-light, and in this situation with the mask, it works perfectly as designed.  The mesh covering the film helps to give it a natural glow.


Visibility through the film and mesh together is good.  I can easily see this being usable enough for me to do photography while wearing the costume, which was my main intention.  I have yet to wear the costume at a convention, but I'm looking forward to it!  I plan on wearing dress pants and collared shirt as to be a mixture of Peter Parker and his alter ego with, of course, one or two DSLR cameras and a camera bag to go along for the ride.
 

Chicago Comic Con 2012

Earlier this month I went to Wizard World Chicago Comic Con as a media organization under my photography centric website, PhotographyBanzai.com.  The main benefit there is that I have less chance of having issues while I take photos, which is always nice.

You can see my coverage of the event here:
http://photographybanzai.com/2012/08/13/wizard-world-chicago-comic-con-2012/

If you have only been to Anime conventions, you might want to check out a comic focused convention in the future.  The attendees usually span a larger age range, which can be a good thing.  Although, as someone who photographs cosplayers and costumers, I sometimes have difficulty getting time with them because people seem to want photographs with the costumers much more often than at Anime conventions.  The biggest benefit is that you don't usually get the age related immaturity problems that sometimes happen at Anime conventions.  The overall focus of comic conventions is more commercial, which is somewhat of a negative depending on your reason for going there.  They often have a large swath of famous people you can meet for a price as well as large dealers rooms with a multitude of things you can buy.  If you are interested in original works of art or lesser know home grown comics, there are usually a large number of artists on site.

Here are a few highlight photos from the event:
 

Cantigny Gardens Cosplay Meetup Photos

Before Chicago Comic Con, I attended a small meetup at Cantigny Gardens in Wheaton Illinois. It is a large park with a lot of green space, flowering gardens, buildings, a tank park (yes, military tanks), and other various structures.

You can also see my first article on Photography Banzai where I talk a bit about the equipment I was using.

Here are a few photos from the event, enjoy! (entire gallery here)


Link leading the charge... on a tank.
These kids were yelling "OMG, it's Zelda!!!" over and over.
 
 
Copyright © 2012+. CVFTA - All Rights Reserved